

Proper Stainless Steel Clamps Installation and Maintenance Details directly affect connection sealing, safety, and service life. Correct pipe preparation, component matching, alignment, and tightening help prevent leakage, loosening, and seal damage.
This guide covers key installation and maintenance points for grooved clamps, press-fit clamps, and hose clamps. It also explains important requirements for food, pharmaceutical, chemical, municipal, and other industrial applications.
1.Stainless Steel Clamps Installation and Maintenance Details: Preparation
Good preparation helps prevent leakage and loosening. Three areas need special attention: component compatibility, pipe preparation, and tool calibration.
1.1 Check Clamp and Pipe Compatibility
Clamp size: Select the clamp according to the pipe outside diameter or nominal diameter (DN) and working pressure.
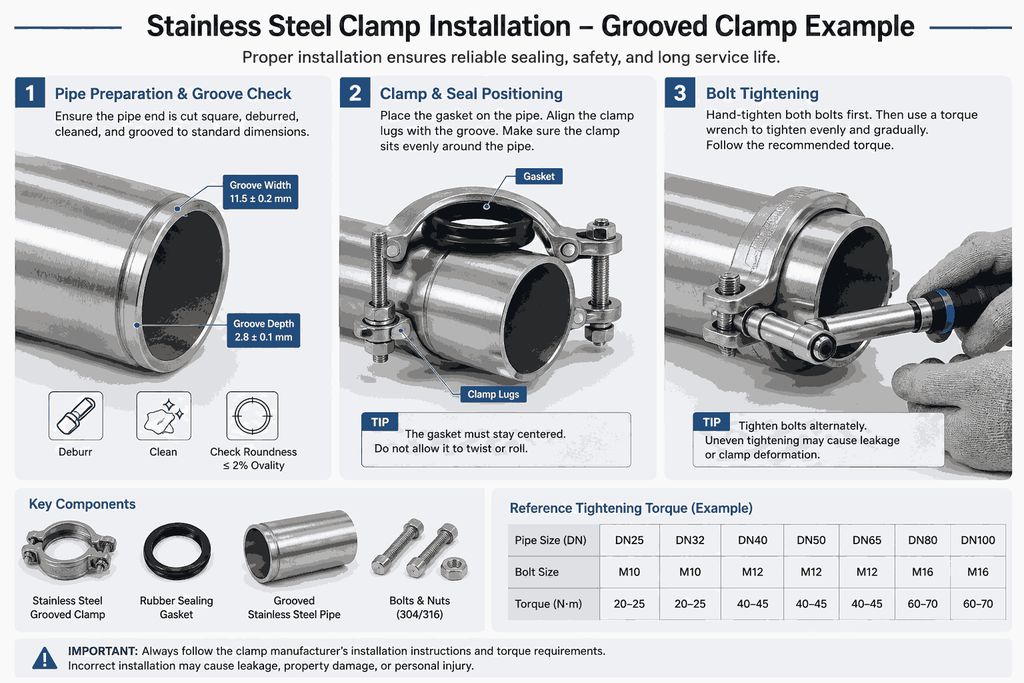
For grooved clamps, a DN100 pipe should use a matching DN100 clamp. For example, the groove depth may be 2.8 ± 0.1 mm and the width 11.5 ± 0.2 mm under GB/T 19228.1-2024. Do not force a DN80 clamp onto a DN100 pipe. The clamp lugs may not engage correctly.
For press-fit clamps, the fitting must match the pipe size. For example, a DN25 thin-wall stainless steel pipe with an outside diameter of 28.6 mm requires the correct press fitting. Mark the required insertion depth, such as 15 mm for a specified DN25 system.
Seal material: Choose the seal according to the working medium.
For food and pharmaceutical applications, silicone rubber with FDA approval or EPDM may be used. Avoid NBR where its extractables may contaminate the process.
For chemical applications, FKM may be selected for demanding chemical and temperature conditions. Actual resistance depends on the chemical, concentration, temperature, and seal grade.
Visual inspection: The clamp should have no cracks, serious deformation, or harmful corrosion. The seal should have no cuts, bubbles, cracks, or obvious aging.
1.2 Pipe Preparation
Pipe preparation is a critical step.
Cut-end treatment: Use a deburring tool or 120-grit sandpaper to smooth the inner and outer pipe edges. Remove all sharp edges and inner-wall burrs. A smooth edge helps protect the seal from damage.
Cleaning: Use a lint-free cloth to clean the pipe outer surface and sealing area. Anhydrous ethanol may be used for suitable food applications, while acetone may be used for suitable industrial applications. Remove oil, dust, and metal particles.
For pharmaceutical applications, cleaning should meet the required process and cleanroom requirements, such as Class 8 or better where specified.
Roundness correction: If pipe ovality exceeds 2%, correction may be required. For example, if a DN50 pipe has an outside diameter deviation greater than 1 mm, use a pipe reshaping tool. Proper roundness helps prevent uneven sealing pressure.
1.3 Tool Preparation and Calibration
For grooved clamps: Use a grooving machine, torque wrench, and vernier caliper. Check groove dimensions during production. A torque wrench with ±5% accuracy may be required.
For press-fit clamps: Use the correct press tool, matching press jaw, and depth gauge. For example, a DN20 pipe requires the matching Φ20 jaw.
For hose clamps: Use a screwdriver or torque wrench and a tape measure. Avoid adjustable wrenches because excessive force may deform the clamp band.
Torque wrenches should be calibrated regularly. A three-month interval may be used as an internal control practice. Always follow the manufacturer’s specified torque.
2. During Installation: Key Operating Details
Different clamp types require different installation methods. The main points are positioning, tightening, and seal inspection.
2.1 Grooved Clamp Installation
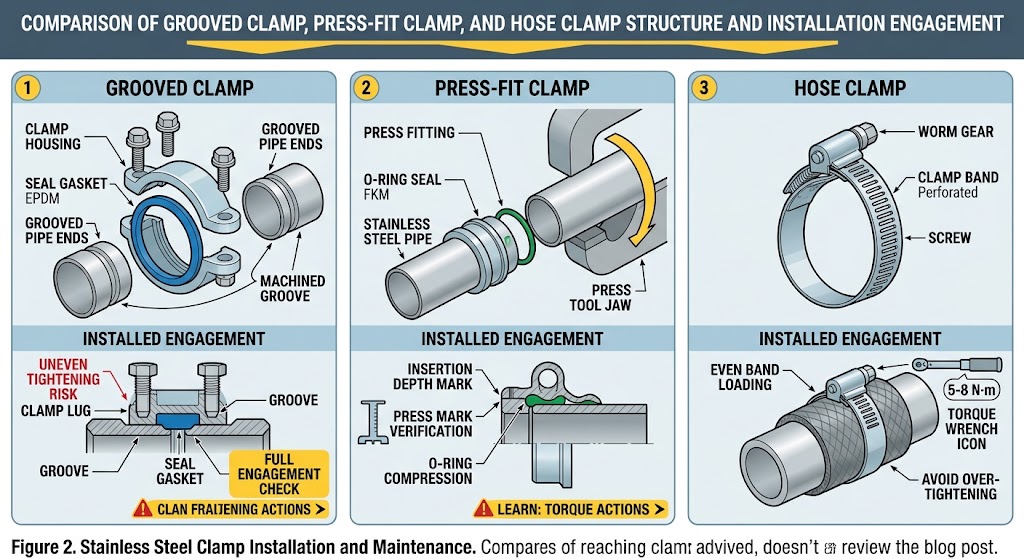
Groove alignment: Make sure the pipe grooves fully engage with the clamp lugs. The clamp should sit evenly around the pipe. Poor alignment can cause uneven loading and leakage.
Tightening: First hand-tighten both bolts until the clamp is seated. Then use a torque wrench to tighten them gradually and evenly.
Do not fully tighten one bolt first. Uneven tightening can deform the clamp and create uneven seal compression.
The final torque must follow the clamp manufacturer’s specification.
Seal inspection: After tightening, check that the seal remains evenly positioned. There should be no obvious extrusion or one-sided compression. If the seal is displaced, loosen the clamp, realign the pipe, and reinstall it.
2.2 Press-Fit Clamp Installation
Insertion positioning: Insert the pipe fully into the fitting up to the required mark. For example, a DN32 system may specify an 18 mm insertion depth.
Insufficient insertion can leave the sealing area partly unsupported and cause leakage.
Pressing: Use a press jaw that matches the pipe diameter. Center the jaw on the designated press point, such as the raised ring on the fitting.
For some systems, a DN25 connection may use a specified pressure of 30–35 MPa. Always follow the tool and fitting manufacturer’s requirements.
After pressing, check the press mark. Some systems require a six-sided mark and a specified press depth, such as 2.5 ± 0.2 mm for a DN25 fitting.
Do not accept a connection with no press mark or an obviously shallow mark.
Do not re-press a failed fitting: Unless specifically allowed by the manufacturer, do not press the same fitting again. Replace the fitting and make a new connection.
2.3 Hose Clamp Installation
Positioning: Place the hose clamp at the required position. A position around 5–10 mm from the hose or pipe end may be used for some connections.
The connected parts should be properly aligned. Incorrect positioning can create uneven band loading.
Tightening: Use a torque wrench when a specified torque is available. Some small hose clamps may require 5–8 N·m, depending on the design.
Do not over-tighten. Excessive force may break the clamp band, deform the hose, or restrict flow.
Multiple clamps: Large-diameter connections may require two or more clamps. For DN100 or larger connections, two clamps may be used in some applications. Follow the manufacturer’s requirements for quantity and spacing.
2.4 Seal Verification After Installation
Hydrostatic test: For liquid systems, the test pressure should follow the applicable standard and project requirements. A common value is 1.5 times working pressure. For example, 1 MPa working pressure may correspond to 1.5 MPa test pressure.
A 30-minute holding period may be specified for some systems. Check the pressure gauge and inspect the connection for leakage or seepage.
Gas leak test: Gas systems require an appropriate leak test. A test pressure of 1.2 times working pressure may be used in some systems, but the actual value must follow the applicable standard.
Soap solution can be used for basic leak detection. High-precision systems may use a helium mass spectrometer leak detector.
The allowable leakage rate must follow the system specification or applicable industry standard. A limit such as ≤1 × 10⁻⁹ Pa·m³/s applies only where specifically required.
3. Stainless Steel Clamps Installation and Maintenance Details: Long-Term Service
Maintenance should be based on the operating environment. Harsh conditions require more frequent inspection.
3.1 Routine Inspection
A weekly inspection may be suitable for normal systems. Critical or harsh environments may require daily checks.
Visual inspection: Check the clamp for corrosion, deformation, and damage. Pay attention to bolts, threads, clamp bands, and connection areas.
Inspect the seal for extrusion, hardening, cracking, or abnormal color changes.
Check for pipe movement caused by vibration, especially near pumps and compressors.
Pressure monitoring: Unexpected pressure loss may indicate leakage or another system problem. Inspect the clamp and surrounding system when abnormal pressure changes occur.
3.2 Periodic Maintenance
A three- to six-month inspection interval may be suitable for many systems. Adjust the interval based on temperature, vibration, pressure, and corrosion.
Torque inspection: Vibration may reduce bolt preload. Check connections near pumps and compressors with a torque wrench.
For high-temperature systems above 100°C, thermal expansion and contraction may change bolt preload and seal performance. Some systems may require inspection every three months.
Use the specified maintenance torque. Do not automatically tighten every connection to a fixed percentage of the original torque.
Seal replacement: Seal life depends on material and service conditions. In some normal applications, a seal may last 2–3 years. This is not a universal service life.
Replace seals when they become hard, cracked, deformed, or damaged. Use a complete seal with the correct material and specification.
For harsh chemical or high-temperature applications, inspect seals more often. Some systems may require annual replacement.
Clean the sealing groove before installing a new seal.
Cleaning and corrosion protection: Food and pharmaceutical systems should follow the required sanitation procedure. Some systems may use 80°C water at 0.8 MPa for cleaning. Dry the connection with clean compressed air when required.
In coastal and high-salt environments, inspect the stainless steel surface regularly. Proper cleaning and passivation may help restore the protective surface film.
3.3 Abnormal Condition Handling
Leakage: For minor seepage, isolate the upstream valve and release system pressure first.
Check the seal position and condition. If the seal is intact, inspect and tighten the clamp according to the specified torque. Do not keep increasing torque to stop a leak.
If the seal is damaged, replace it with the correct specification and material.
For serious leakage, stop the system and release pressure safely. Check the pipe, seal, and clamp. If the pipe is deformed, cut and prepare the pipe again. If the clamp is damaged, replace the complete clamp.
After repair, repeat the required pressure or leak test.
Corrosion: For local corrosion, identify the cause before repair. Avoid contaminating stainless steel with carbon steel tools or particles.
If corrosion has caused significant material loss, replace the clamp and inspect the connected pipe.
If corrosion affects a large area, such as more than 30% of the clamp surface, replacement may be required because clamp strength may have been reduced.
Press-fit failure: If a press-fit connection leaks, check the pipe insertion depth, press mark, press position, fitting, and seal.
If the fitting or seal is damaged, replace the fitting according to the manufacturer’s procedure. Do not use uncontrolled force to repair the connection.
After replacement, perform the required pressure test.
4. Additional Considerations for Special Applications
Different environments require different installation and maintenance controls.
Food and pharmaceutical applications: Focus on hygiene, cleanability, seal compatibility, and contamination control. Cleaning procedures should follow the production site’s requirements.
Chemical applications: Check stainless steel and seal compatibility with the actual medium. Consider chemical concentration, temperature, and pressure.
Municipal water systems: Check pipe dimensions, pressure rating, sealing performance, and applicable local standards.
Coastal and high-salt environments: Chloride exposure increases corrosion risk. Inspect the clamp surface, bolts, and connection areas regularly. Cleaning and passivation may be required.
High-temperature systems: Check seal temperature limits and consider thermal expansion and contraction. Temperature changes may affect bolt preload.
High-vibration systems: Inspect clamps near pumps, compressors, and motors more often. Check both the clamp and pipe supports for movement.
Insights
Reliable stainless steel clamp connections depend on proper installation and regular maintenance.
During installation, control component compatibility, pipe preparation, alignment, insertion depth, and tightening torque. After installation, complete the required pressure or leak test.
During service, inspect for leakage, corrosion, seal aging, vibration, and pipe movement. Adjust the inspection frequency to the working environment.
Most importantly, grooved clamps, press-fit clamps, and hose clamps have different installation requirements. Food, pharmaceutical, chemical, municipal, and other special applications also require specific controls.
Following the correct Stainless Steel Clamps Installation and Maintenance Details helps improve sealing performance, connection safety, and service life.